Automated Induction Thermography Enhances Forging Crack Testing

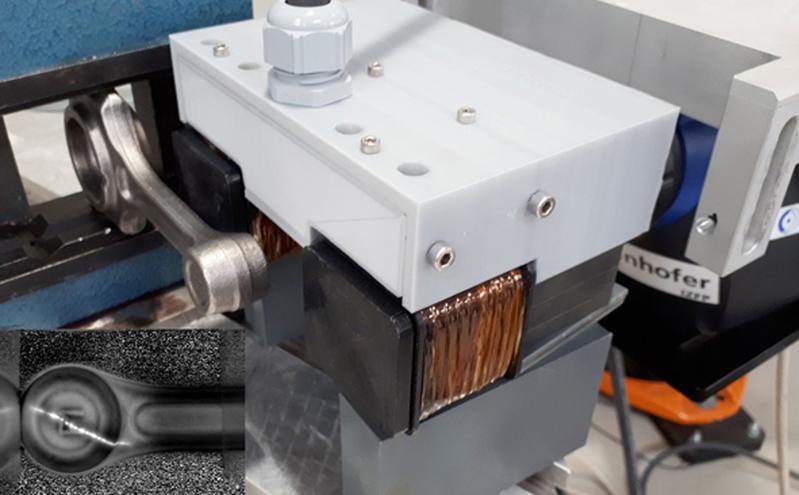
Inspection head for automated detection of surface defects in forged steel parts. Inset bottom left: Thermographic indication of a crack.
Fraunhofer IZFP
This study is intended to confirm the increased inspection reliability compared to current standard procedures. The resulting optimized economic efficiency of this new procedure will significantly contribute to the competitiveness of small and medium-sized enterprises (SMEs).
Induction thermography* is applied in many industrial sectors where forged or steel components are in use. These include the automotive industry, e.g. car steering systems, petrochemical industry and water supply (steel water pipes).
Notwithstanding continuous improvements in the manufacturing processes, failures may occur in the manufactured components, for example also due to pre-material defects. Thus, nondestructive inspection of components where the inspection is performed by one of the established and standardized inspection methods, such as ultrasound for volume defects or magnetic particle inspection** for surface defects, is generally required.
Fully automated inspection with digital product file
In the mentioned AiF project, which is lead-managed by Fraunhofer IZFP, the thermographic crack inspection for the detection of near-surface defects in steel parts is subject to a close scrutiny: On the basis of reliable and resilient investigations scientists of the institute are to test and confirm the potential of this method in comparison to standardized magnetic particle testing. The project results are intended to provide forging plants an economic basis which is to facilitate future decisions in favor of the method.
“A major aspect of the project involves the implementation of an automated image analysis for defect detection without human intervention. The recorded thermographic image sequences are automatically analyzed and assessed. After this, the results are stored and provided in the form of a so-called 'digital product file',” explains Dr. Udo Netzelmann, Fraunhofer IZFP’s lead project manager.
Enhanced inspection reliability and reduced inspection times
When comparing fully automated inspection by induction thermography to magnetic particle inspection the Fraunhofer IZFP specialists defined the goal of achieving at least the same level of inspection reliability with at least the same, but ideally reduced inspection times. “By the use of this thermographic method, we expect this to lead to a reduced dependance on the skills of the inspection personnel and, as a consequence, a substantial reduction in rejects. In addition, the test substances used in magnetic particle testing – some of which being harmful to health – are superfluous. Thus, there is no more need to clean the surface and to dispose of the chemicals afterwards,” states Udo Netzelmann.
Hence, it will be possible to store and document the raw data of any inspected component as well as the images of the defect indications. Even after longer periods of time conclusions concerning defect sources can be drawn easily. System integrators and suppliers of inspection systems will seriously benefit from the results.
Cognitive sensor systems – efficient processes
Fraunhofer IZFP is an internationally cross-linked research and development institute in the field of applied, industrial-grade research. Its activities zero in on the development of “cognitive sensor systems” for the nondestructive monitoring of industrial processes and value chains. Major concepts of these technologies are derived from AI research.
In addition to pure production processes, the activities cover equally processes from materials and product development, maintenance, repair, and recycling of materials.
* With this technology, an inductor generates an alternating current in the electrically conductive steel. In case of the induced current strikes a surface crack, it has to make a detour around the crack. Due to ohmic losses the current flow in the component is correlated with material heating up. The current density is changed by cracks, resulting in characteristic defect signatures visible for infrared cameras. The image sequence recorded with the infrared camera can be evaluated in a short time. After pre-processing and automated defect detection, the defect images are displayed.
**In crack detection by magnetic particle inspection, the surface of the component to be inspected is sprayed with a magnetic test medium. In many cases, a fluorescent test medium is used, with a dye attached to the magnetic particles. This dye glows visibly under ultraviolet light, thus marking the crack and its course for the assessment by an inspector. In the aftermath, the test medium usually has to be washed off and disposed of properly.
Dr. Udo Netzelmann | Fraunhofer Institute for Nondestructive Testing IZFP | Phone +49 681 9302-3873 | Campus E3 1 | 66123 Saarbrücken, Germany | www.izfp.fraunhofer.de | udo.netzelmann@izfp.fraunhofer.de
https://www.izfp.fraunhofer.de/en/


