Laser replaces hammer

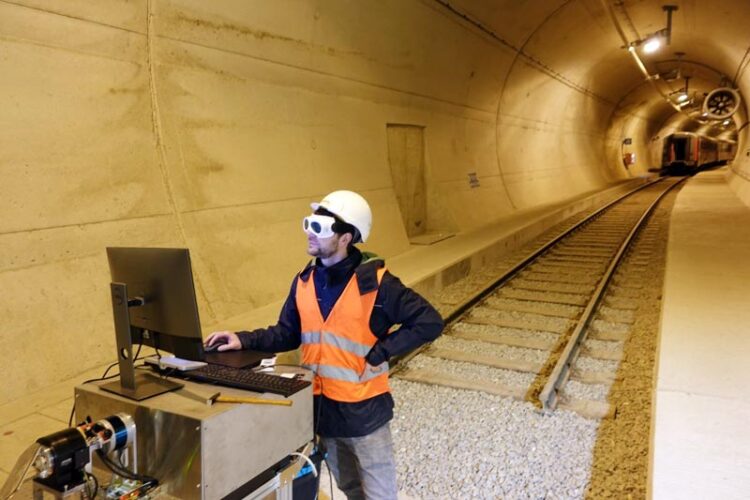
Damage to concrete structures is often hidden underneath the surface. With laser-induced vibrations, these subsurface defects can be efficiently detected and automatically evaluated – more accurately than the common impact hammer test can. Measurements have shown that this also works under real conditions inside a tunnel (here, underground research facility ZaB, Austria).
© Jannis Gangelhoff / Fraunhofer IPM
New method for testing the structural integrity of buildings.
Building inspection benefits from laser-based measuring systems providing quick and accurate digital measurement data. Laser scanners are already being used to measure building geometries or to detect surface damage. In the future, lasers will help detect subsurface damage, too. Up until now, the only way of detecting hidden defects was the so-called impact hammer test.
When it comes to assessing the condition of a building, visual inspections are still widely used. But what about damage below the surface? Hidden cavities or material delamination are often indicators of impending major damage. Detecting them as early as possible is part of the predictive maintenance of tunnels, bridges, dams, canals and other infrastructure buildings. But critical construction measures, such as the dismantling of nuclear power plants, also depend on integrity tests. A research team at Fraunhofer IPM has developed a system that enables non-destructive delamination testing using a pulsed laser.
Quantifiable measurement data for predictive maintenance
Test measurement on a concrete cube measuring 50 cm × 50 cm: AI-based software developed by Fraunhofer IGP identifies conspicuous measuring points, localizes areas of damage and immediately visualizes the results. Individual measuring points are visible; their color provides information about the intensity of the vibration. Bright areas indicate delamination in the center of the specimen. Each measurement signal can also be displayed in detail as a graph. © Fraunhofer IGP
The so-called impact hammer test is still the state of the art for the detection of hidden defects such as delamination. A special testing hammer is used to tap the entire surface, but considering the size of these surfaces this is extremely cumbersome. The only sensor used in the impact hammer test is the human ear, which perceives the resonance vibrations excited by the hammer. Apart from being time-consuming and therefore costly, this method does not provide objectively quantifiable measurement results, making comparisons over long periods of time, that would indicate emerging defects, virtually impossible. What’s more, modern condition monitoring based on Building Information Modeling (BIM) requires digital measurement data.
The contactless process developed at Fraunhofer IPM uses a powerful pulsed laser substituting the mechanical hammering. The laser creates plasma in the air right above the object’s surface without damaging it, which will excite characteristic resonance vibrations on the surface – similarly to a hammer – if delaminations, cavities or defects are present underneath the surface. The resulting vibrations are detected using a second laser: A laser doppler vibrometer (LDV) measures the mechanical vibration of the concrete surface directly via the doppler shift of the backscattered light, which is evaluated by interferometry. The amplitudes and frequencies of the vibrations provide information about the size and depth of the cavities and defects. A rotating mirror deflects the laser beam along two axes above the surface. With the current system, it takes just 17 minutes to test around 100 m2 with a measuring grid of 10 cm, or even less time with a lower resolution. Parallelizing and optimizing system components can accelerate the process even more.
Reliable measurements from a distance of several meters
Evaluation measurements on a concrete block showed that, from a two meter distance, the laser-based system provided more accurate results than the classic impact hammer test. The laser-induced vibrations reliably detected defects of down to a few centimeters in size; the mechanical method had not been able to identify the same defects. The laser scanner was then tested under real conditions in several selected tunnels. The researchers are now working on upgrading the system for real life applications and setting up a productive system.
Wissenschaftliche Ansprechpartner:
Prof. Dr. Alexander Reiterer, Head of Department Object and Shape Detection, Fraunhofer IPM, alexander.reiterer@ipm.fraunhofer.de
Weitere Informationen:
http://www.ipm.fraunhofer.de/en Fraunhofer-Institute for Physical Measurement Techniques IPM
Media Contact
All latest news from the category: Architecture and Construction
Newest articles

A new puzzle piece for string theory research
Dr. Ksenia Fedosova from the Cluster of Excellence Mathematics Münster, along with an international research team, has proven a conjecture in string theory that physicists had proposed regarding certain equations….

Climate change can cause stress in herring larvae
The occurrence of multiple stressors undermines the acclimatisation strategies of juvenile herring: If larvae are exposed to several stress factors at the same time, their ability to respond to these…

Making high-yielding rice affordable and sustainable
Plant biologists show how two genes work together to trigger embryo formation in rice. Rice is a staple food crop for more than half the world’s population, but most farmers…


